Excel VBA Reference

Excel’s VBA function allows the user to enhance a workbook by allowing them to automate and manipulate elements and tasks into the excel workbook. Excel uses the programing language visual basic which is an event-driven programming language that is user friendly and specifically for beginners. I remember when I first used VBA to automate formatting of data, with a push of the button I saved 15 minutes every day.
Table of Contents
- Developer
- Range
- Range Properties
- Cells
- Variables
- Editor Toolbars and Menus
- VBA Logic
- Loops & Reports
- Events
- Workbook Events
- Workbook Open
- Workbook Activate
- Before Save
- After Save
- Before Close
- Before Print
- Workbook Deactivate
- New Chart
- New Sheet
- Sheet Activate
- Sheet Before Delete
- Sheet Before Double Click
- Sheet Before Right Click
- Sheet Calculation
- Sheet Change
- Sheet Deactivate
- Sheet Selection Change
- Window Activate
- Window Deactivate
- Window Resize
- Active X Controls
- User Forms
Developer
Developer Tab
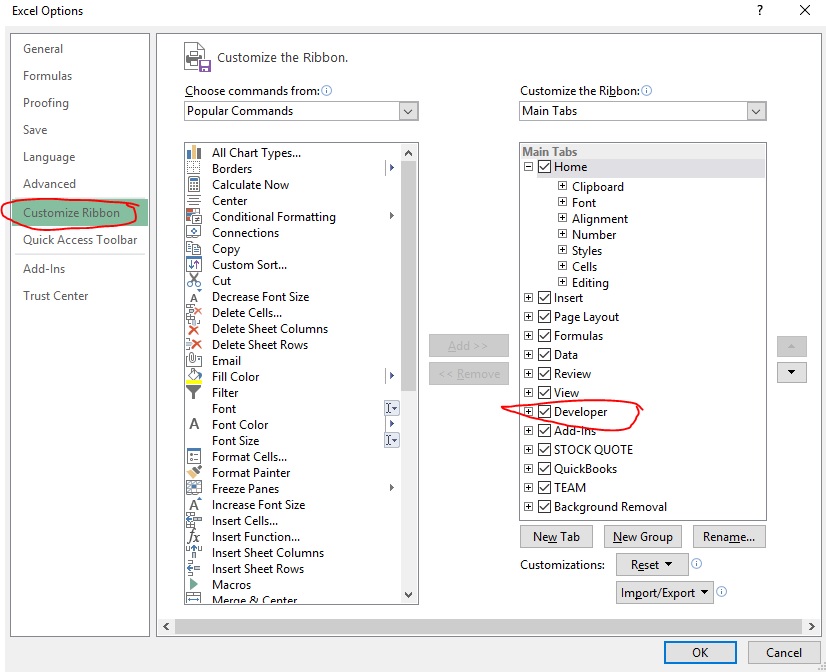
To enable the developer tab go to File –> Options –> Customize Ribbon –> check Developer box –> OK.
Range
Range Object
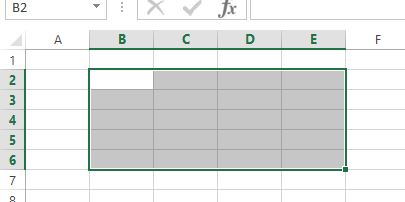
The range object is the rows and columns of the element(s). For instance, if I have highlighted the first cell it would be a range of A1. If I highlighted the first three columns and first three rows it would be a range of A1:C3. For multiple columns you just take the first element : then the last element in range.
Creating a Macro
To open up the VBA developer IDE(Integrated Development Environment) use the shortcut key alt+F11. Alternatively you can go to the Developer tab and click on Visual Basic.
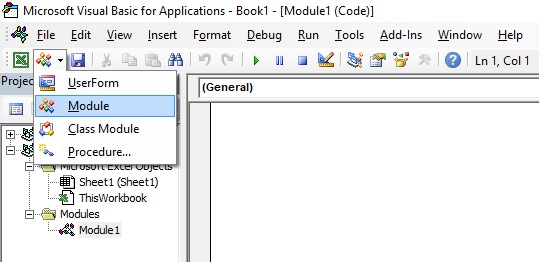
To write your code you need to create modules. Click on the icon Insert Modules, they look like skittles, then Module. You can have as many modules as you like.
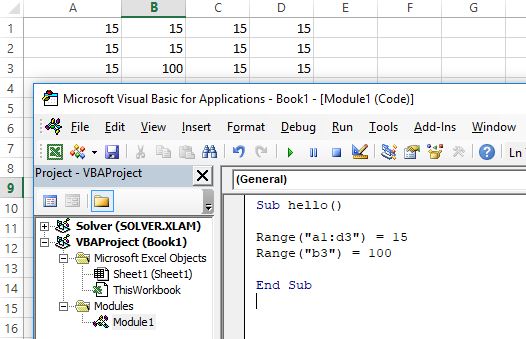
Your macro code will go in between Sub MacroName() and End Sub keywords. To specify a value to a specific cell use the Range("rowcolumn") = value. To run the macro click play button (green triangle). You can also specify multiple cell ranges using the :. You can set value to strings using the "" ex: Range("a1") = "Hello World!"

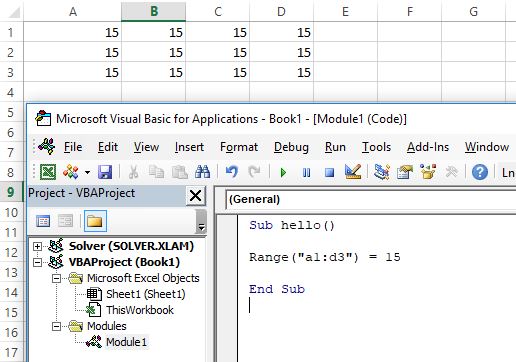
You can stack multiple commands one right after each other. The compiler will read the code from top down.
Debugging
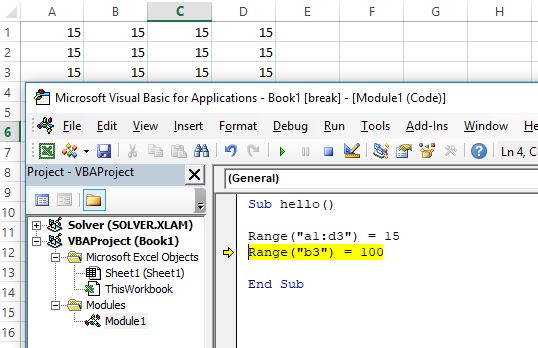
You can debug each line of code in excel by using the F8 key and watching one by one what happens to the workbook. As your code gets longer there maybe some logic error in your code that needs to be fixed; using the debugger tool will help assist you.
Saving Macro
In order to save a macro workbook it needs to be saved with the xlsm file extension or else it will not work. So when saving the first time the save as type should be Excel Macro-Enabled Workbook.
Executing Macros
alt+F11and then clickplaythenrun- on developer tab click
Macrosicon and thenselectmacro andrun(shortcutalt+F8)
There are more sophisticated ways such as clicking on a button or a specific cell etc..
Multiple Cells One Range
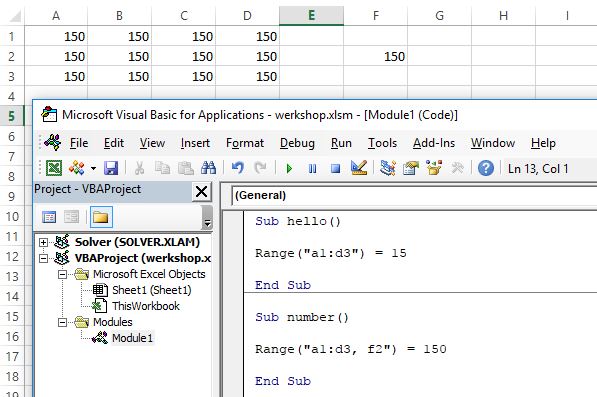
You can set values to multiple cells in one range command ex: Range("a1:c4, e3") = 15.
Named Range
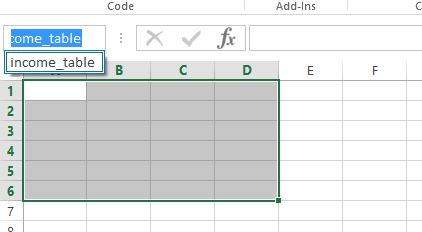
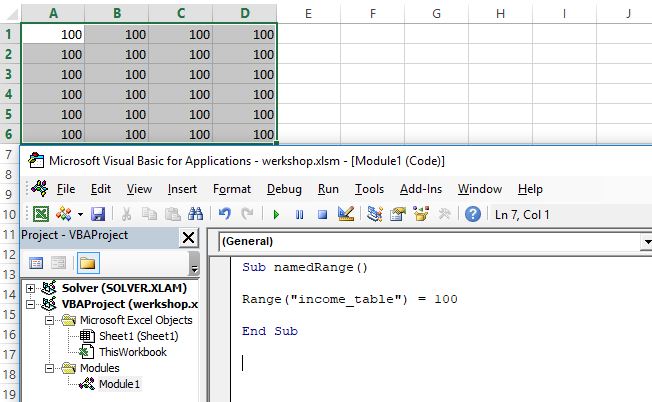
Instead of specifying specific rows and columns in a macro you can set the range to reference a named ranged.
Range Properties
Value
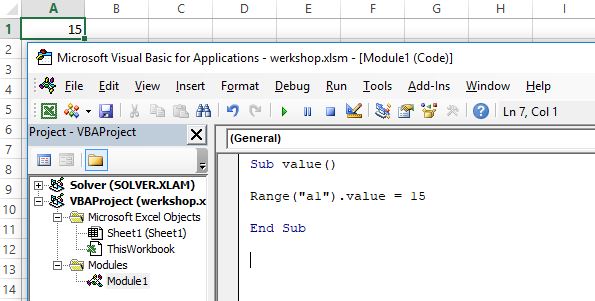
To access properties you use the . operator and a list of properties available should pop up. The value property gets the value for the range.
Text
The text property gets the data as a string. If you don’t specify a property the default is the value property.

Row and Column
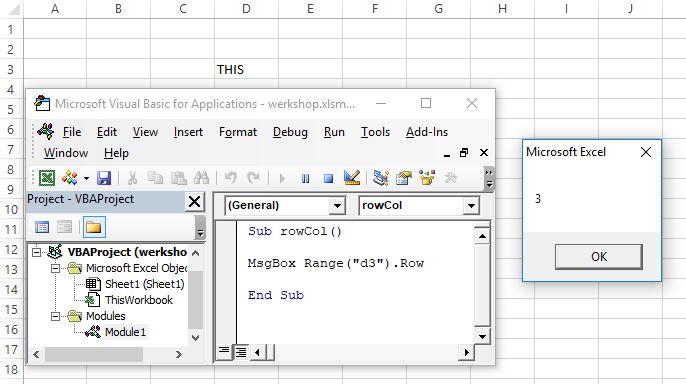
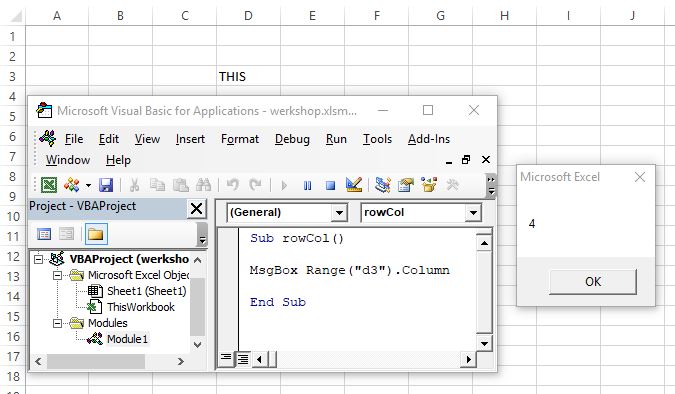
The row and column property will return the row number and column number back in integer of the range.
Select
The select property sets the cursor location to the referenced name.

Count
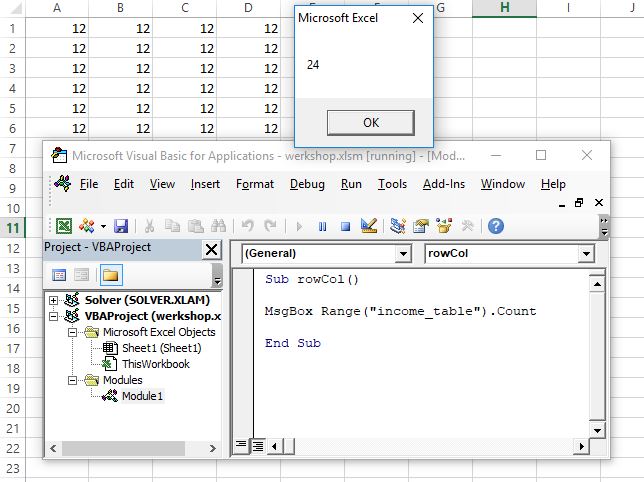
The count property counts how many cells are in the referenced range. Note it does not matter if their is data in the cell or not.
Address
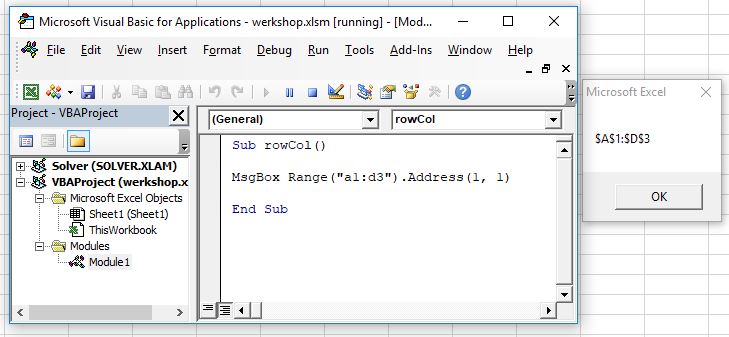
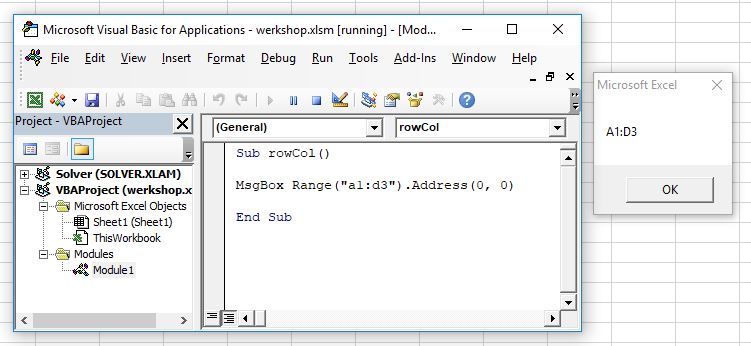
The address property of a range returns the location of the row and column as in excel ex: A5. You can specify if you want absolute paths of the row/column by specifying a 1 or 0; absolute includes the $ sign.
Formula
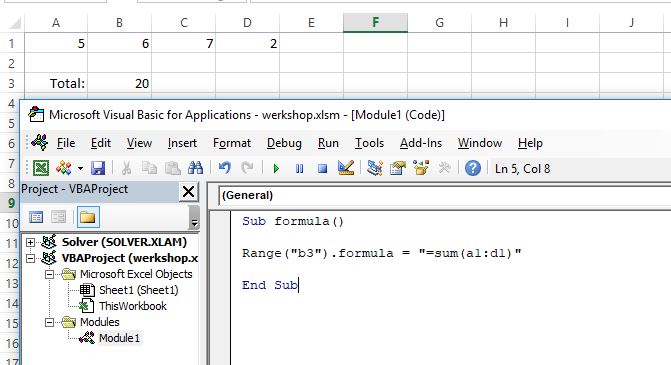
The formula property allows you to set a formula to a specific cell.
Number Format
The number format changes the format of the value from general to currency, accounting, date, time etc…

Font Bold, Underline, Italic, Name, Size
The font property you can change the style of the font but it takes a boolean (true/false) value. You can also use Font.Name = "Font Name" to change the font type. Also change the size by using Font.Size = 12.

Cells
Cells Object
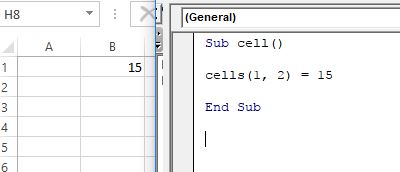
The cells object is similar to the range object but instead of a range you put in the cell coordinates as integers (row, column). This is great for looping through entire rows or columns. You can substitute the column numbers for letters but need to put them in ""

Cell Position
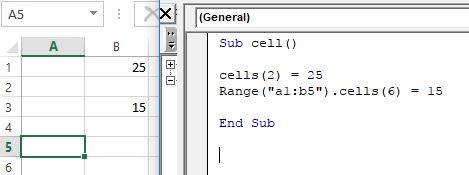
You can reference the cell’s position by specifying the integer location. It starts with the row A1 = 1, B1 = 2, C1 = 3 etc. However, if you select a range and then use the . operator and use cell object it will only count within the referenced range.
Select All Cells
You can select every cell in the workbook by simply not referencing a specific cell; Cells.

Range Object With Cell
Sometimes you will want to select from a specific cell to cell without hardcoding the range. You can do this by using Cell(r,c) as a parameter for the Range() object.

Variables
Variable Types
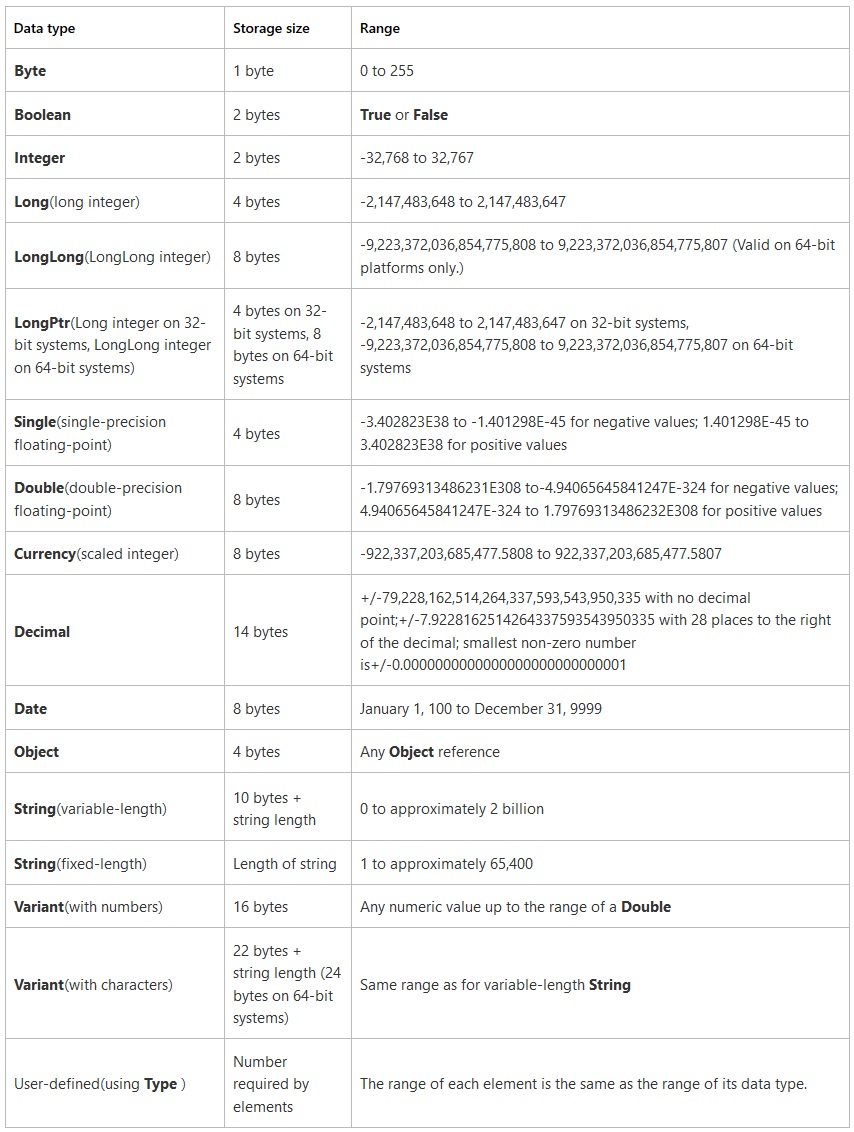
The table below shows what data types are supported as well as their memory size.
Declaring Variables
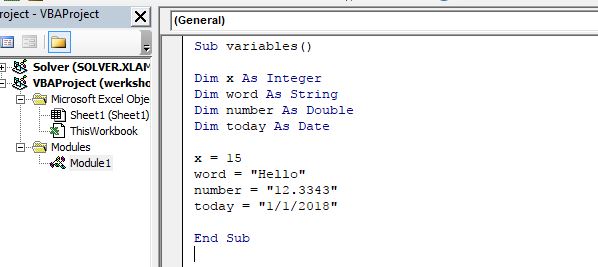
You declare variables by using the keyword dim followed by variable name then keyword as followed by data type; dim hello as String, dim x as Integer. Once declared you assign a stored value by using the = operator.
Call A Procedure
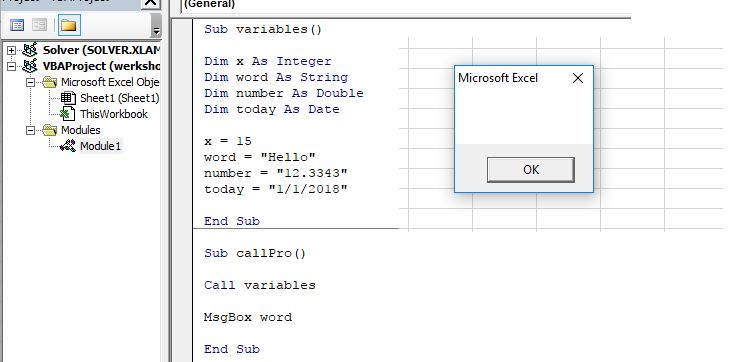
To call another procedure (function) use the Call keyword followed by the procedure’s name, ex:Call myMethod. If there are variables declared within the called procedure then the values will be out of scope and not recognized by the compiler.
Public and Private Variables
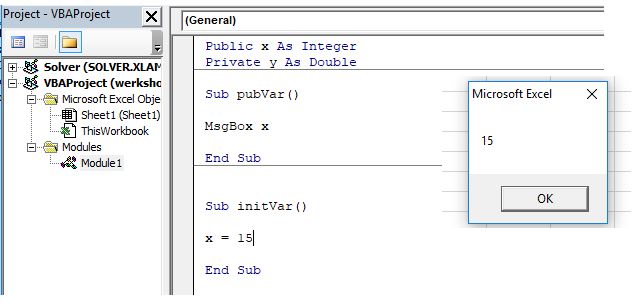
When setting a variable as Public the variable will retain its data and can be used throughout any other module. When setting a variable as Private the variable can only be accessed only within the module it is initialized in.
Using Constants
Declare constants by using the Const keyword and you must assign data when declaring. Constants cannot be changed.
Const PI as Double = 3.14. You can also make the constants public or private.
Concatenate Strings
You can combine two or more strings by using the & symbol. This will also work to combine string variables. text = "Hello " & "World!"
Pass by Value vs Reference
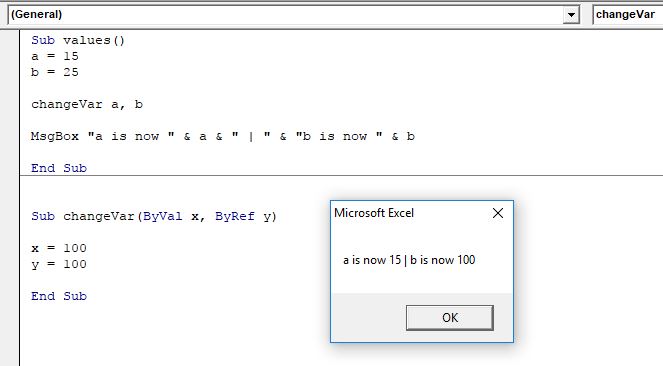
When passing values into a procedure use the keywords ByVal & ByRef to specify how you are passing the variables through. By value means that only the value is being passed and will not change once the procedure is ended. By reference means that any changes made will change the original value.
Editor Toolbars and Menu
File Menu
The file menu you have your basics save, print, remove. The Remove module will delete your file. You can Export your code and save it as a .bas file. You can also Import your written code from a .bas file.
Edit Menu
In the edit menu the List Properties/Methods (ctrl + j) will open a dropdown menu with all of the available options of properties and methods. Another tool is to use the Bookmarks to save the location of a particular code so you can reference it later if need be.
View Menu
View menu has the some useful tools other than adding different menu items to your toolbar. Last Position will move the cursor back to it previous location. Definition opens up a window with a list of all the properties/methods along with a description on each. Object Browser is similar to definition but displays a list of all the objects.
The Immediate button will open up a window where you can change temporary change your code; such as, change a variable’s data. Also in the Immediate window you can write debug.Print varName to display the result.
The Locals window will display information about all of the local variables in the current modules. The Watch Window allows you to select a variable to shadow and displays its changes throughout the code (good for debugging). It will also display vast amount of information that can be toggling the + symbol next to it.
Debug Menu
The Debug menu is really important as it will help you find and fix errors in your code. Step Into when run goes into any methods and runs the code line by line. If you wanted to get out of a method Step Out will get you out of any methods/subs. Run to Cursor will run the code from beginning to where your cursor is.
In addition is you can also add, edit, remove watches. Toggle Breakpoint will run the code up to the breakpoint then wait for you to resume the code until the next breakpoint or end. Set Next Statement will allow you to temporary skip code and jump to the marker (yellow arrow) and start running code from that line.
Logic
Last Row
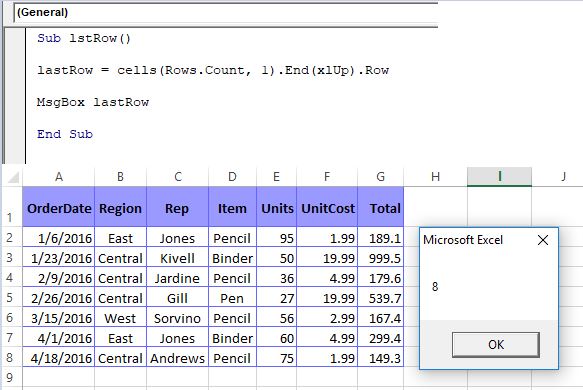
To find the last row of the data set in your workbook combine these methods and it will return the last row value as an integer ex: lastRow = Cells(Rows.Count, 1).End(xlup).Row. What this does is it goes through all the rows in column one. Then it goes up until it finds the first cell with a value in it.
Last Column
To find the last column of the data set in your workbook cmbine these methods and it will return the last column value as an integer ex: lastColumn = Cells(1, Columns.Count).End(xlToLeft).Column. What this does is it goes to to the last column then back left to the first cell with a value in it.
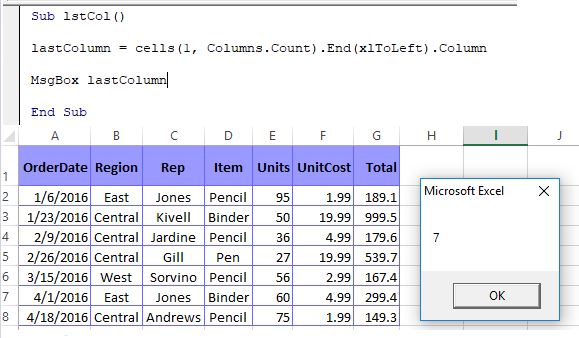
Next Row
To get the next row you simply use the formula for the last row and add 1 to it ex: lastRow = Cells(Rows.Count, 1).End(xlup).Row + 1
Record Macro
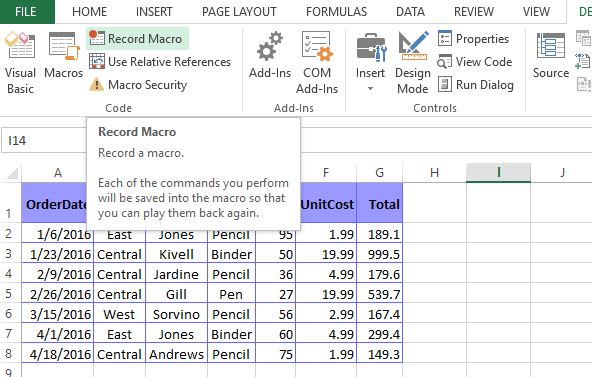
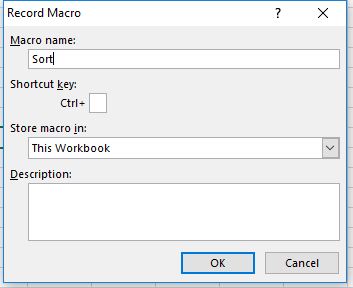
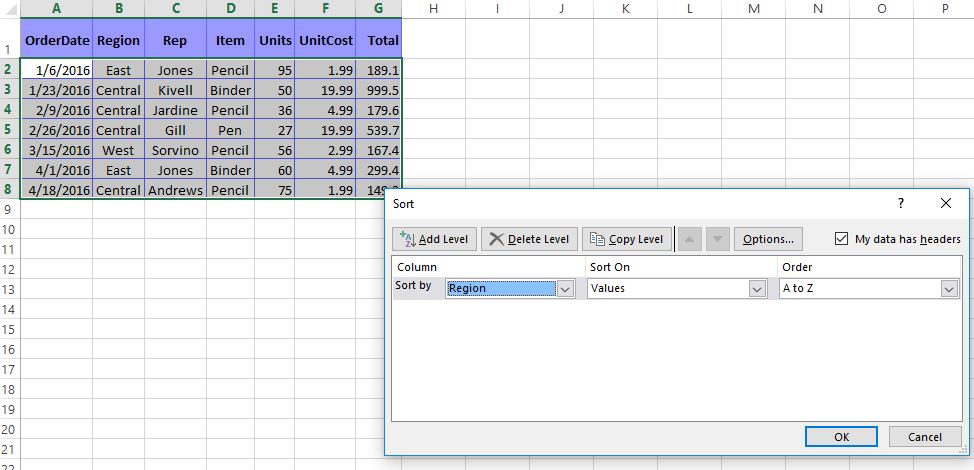
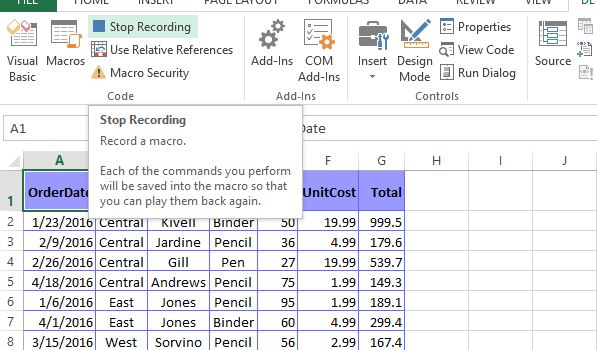
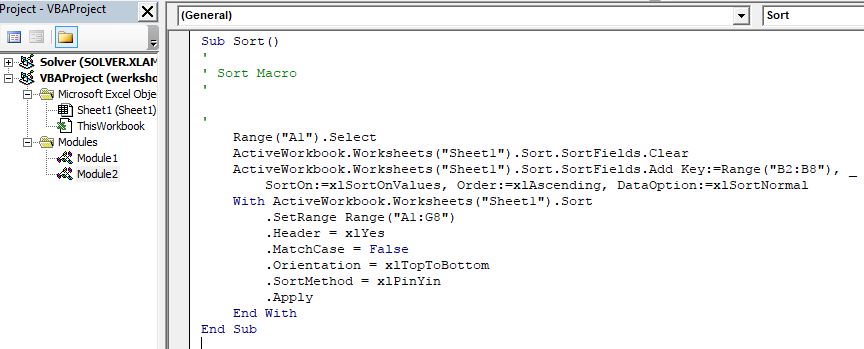
Excel give you the ability to record a macro while you perform the function on the physical workbook. It then creates a module with the code written. See sample below on steps to recording a macro.
Absolute vs Relative Reference
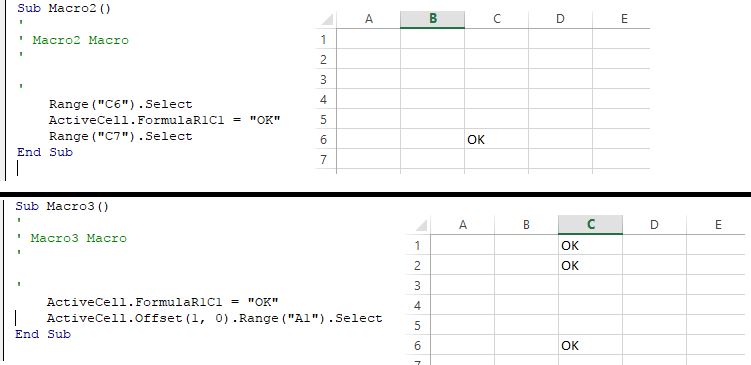
Absolute reference is when objects are referring to a specific cell, which is hard coded. When the macro is run it will always reference to that specific cell. Relative reference dynamically changes the location of the cell by using the current position of the cursor as the starting point. To use relative reference make sure to check the Use Relative References button.
With and End
If you have multiple commands to execute within a cell its best to use a With & End With block to save repetitive typing and keeping clean code.

Comparison Operators
=equal to<>not equal to<less than>greater than<=less than or equal to>=greater than or equal to
If Then
Use the If Then keywords to create and execute a conditional statement; if the condition is true. You need to always need to close the conditional block by using End If.

If you just have one condition to check you can write the if statement, without the Then in one line ex: If Range("c3") = 11 Then MsgBox "YOLO".
Is Not Equal To & Not
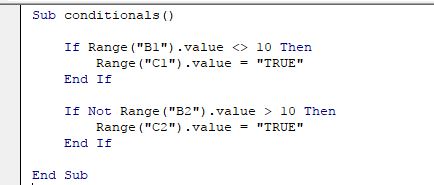
You can use the <> is not equal to operator to create the opposite of the equals operator ex: If range("A1").value <> 1 Then etc… You can also you the keyword Not after If to say if cell value is not equal to “x” then execute these commands.
Else
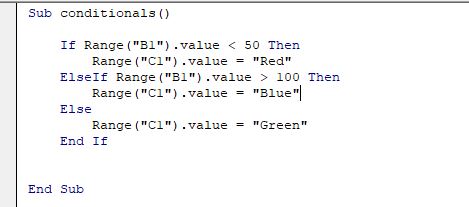
Use the Else keyword to create a nested conditional statement so that if all the If Then statements are false then the Else statement will run.

Else If
Use the ElseIf keyword to combine as many conditional statement you need. The structure will start with If condition Then then ElseIf condition Then and finally Else
Comparative Operators Text & Numbers
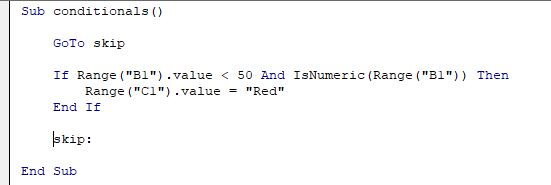
When comparing numbers, if the cell data is text then the compiler will accept it and convert it to a number; however, to prevent this in the If statement use method IsNumeric(cellLocation) ex: IsNumeric(Range("a1")). The And keyword must be used to allow for multiple conditionals where both statements must be true in order for statement to execute.

GoTo & Labels
If you have parts of your code that need to be skipped for whatever reason then the GoTo keyword along with labels allow you to do this. The label must be spelled the same and must include at : after it.
Select Case
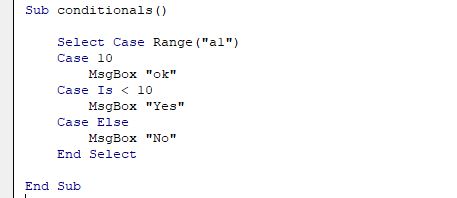
Similar to If Else the Select Case keywords are good for conditionals on a specific value. It makes code cleaner and much easier to read/write than If Else. You must end the block by using End Select.
Message Box Options
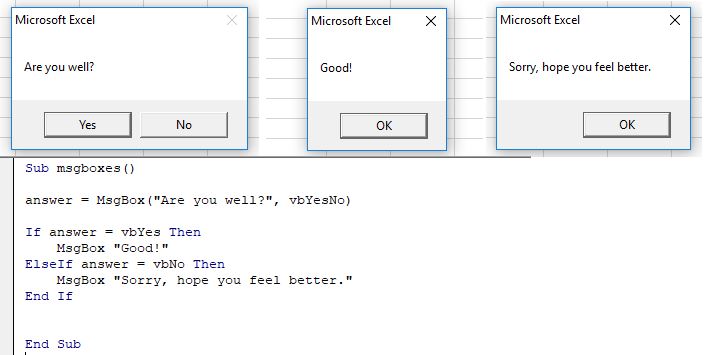
The message box object can be modified to have several other options; such as, yes and no buttons. Utilizing the options will allow you to create a more visual and user friendly experience. To enable the options you use the function MsgBox("text", options). It is a good idea usually to store the user’s answer into a variable.
Relative Positioning
You can select any cell from your current cursor position using the Selection and Offset(row, column) functions. You don’t have to use selection only you can use the Cells or Range object with the Offset.

Loops & Reports
For Loop
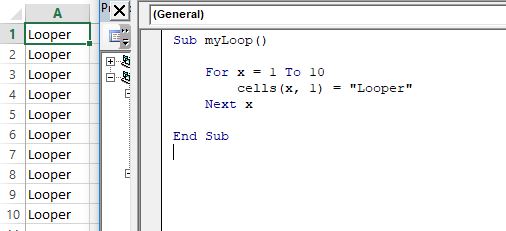
The For Next is a good loop to cycle through a row or column. The formula for For loop is For counter_var = starting_value To ending_value and to increment the counter use Next counter_var.
Simple Report
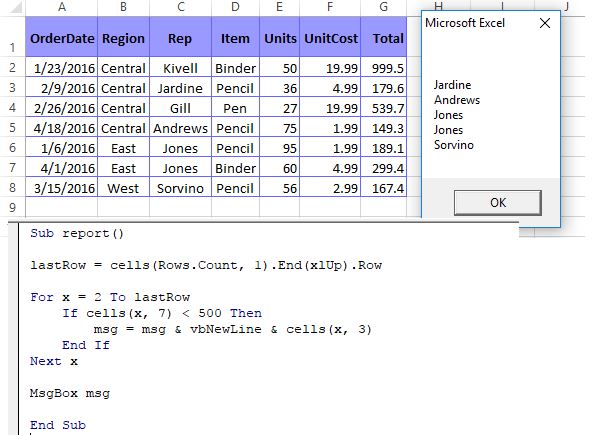
Using the for loop and conditionals you can create a simple report to grab specific data from the worksheet to be able to print out. The below example will grab data of anything under $500 in sales. To create a new line use the keyword vbNewLine.
Input Box
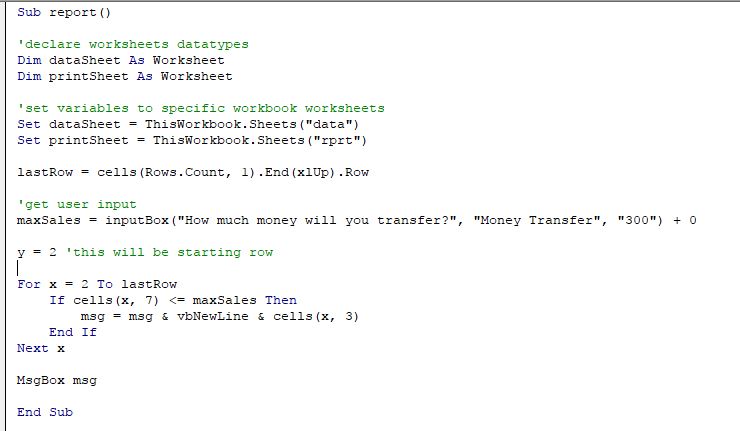
Input boxes allow you to receive some data from the user. Use the function inputbox("prompt", Title, "default value") and set it equal to a variable to store the value.

You can convert text to number a couple of ways. The first way is to add 0 to the the number ex: "200" + 0.

Sometimes you will have debug error if you cancel out of an input box. To prevent this use the On Error Resume Next to allow the code to continue on error. Also use an If statement to check that the input is not Empty Then Exit Sub.

Button
To add a button which executes other code when use the graphical interface in the insert tab and preferably use ActiveX Controls ones. Drag and hold until the size is what you like. To edit the properties right click and select properties.


To link it to a function use the Call keyword so that when the button is clicked it executes the function. Double click on the button to open up VBA editor.

Another way to make buttons is to use the Shapes in the Insert tab. You can then right click and assign a specific macro to it. This allows your buttons to good visually instead of the generic dark gray square buttons.
Report
Below is an example on creating a simple printable report. It is important to use the Set keyword to link worksheets to a variable.

Use Dim to declare variables and link them to specific data in the workbook.
Since we are now using more than one worksheets we must specify which worksheet we will be using before using functions such as Cells Range etc.
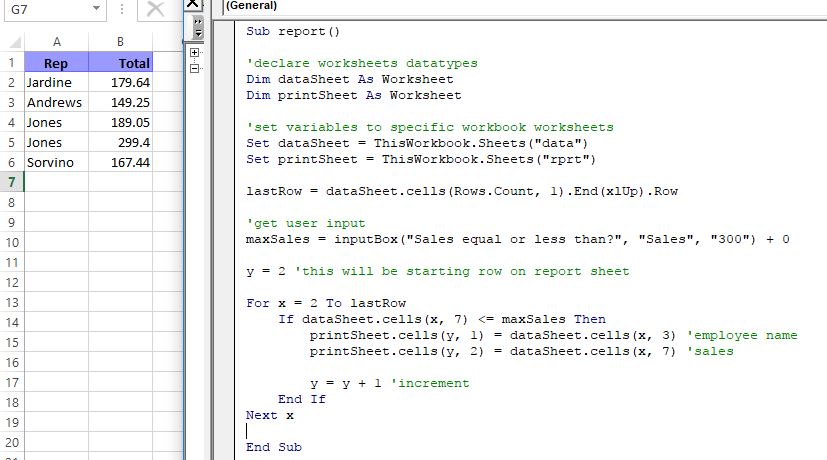
After running the report once the original report will stay. If you add remove data and run the report again you may have data in there from previous runs. it is best to create a function to clear out the old report before running the new one. Use the ClearContents object for that.
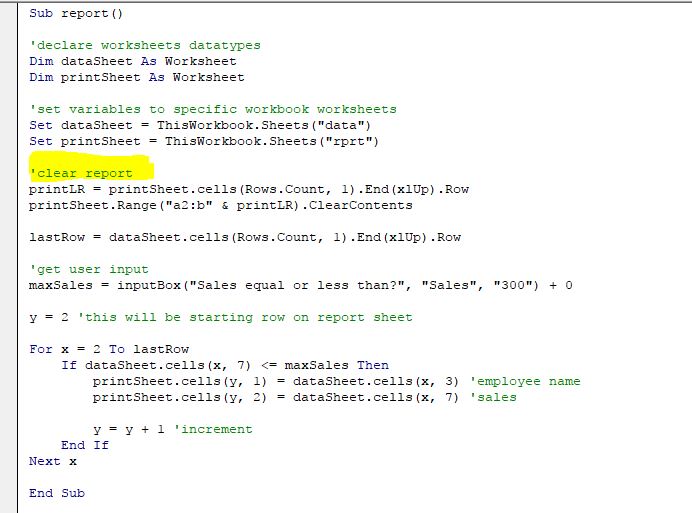
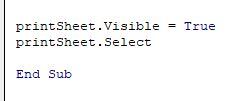
To automate the movement to the report tab so that the user doesn’t have to manually find it or go there. If sheet is hidden use the Visible object and set it to true. Then you will have to use Select object to move user’s view to the worksheet.
Printing
You can set a worksheet on print preview mode by using the PrintPreview object ex: wrksht.PrintPreview. It will then automatically create and print preview of the worksheet.
To send the worksheet out to the default printer use the PrintOut(args) object. One property copies: 1 should be set to one unless you want more.
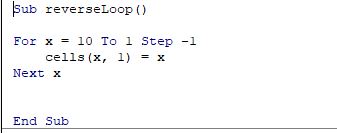
Reverse For Loop
To go backwards in a loop use the Step keyword instead of Then.
For Each Loop
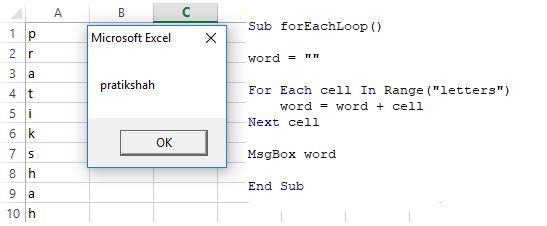
The for each loop will loop through an entire group of objects. One example is the named table you can loop through the entire table. Use the keywords For Each cell In Range("letters") and then to continue use Next cell. You can exit the loop if need be you can use Exit For.
Do Loop
Do loop keeps looping through until a condition is met. Do loops can go into an infinite loop if you do not give a condition that reaches true and breaks the loop. Use keyword Do and Loop.
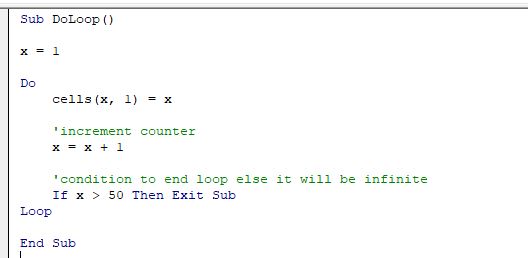
Do Loop
The Do Until forces you to specify a condition so that when true it will break out of the loop. You can still have an infinite loop if the condition never reaches true. It checks the condition before entering the loop.
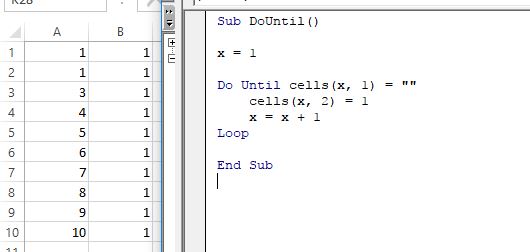
Loop Until
The Loop Until forces you to specify a condition at the end of the loop; however, it will run the loop block at least once before checking the condition.
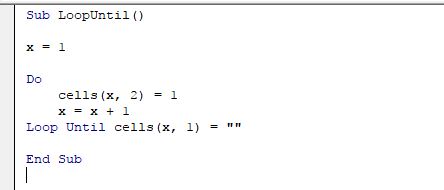
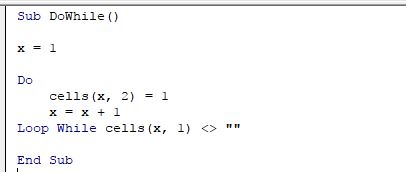
Do While
The Do While loop keeps running while the condition is true. This is different such that the condition is already true while the previous loops the condition was false.
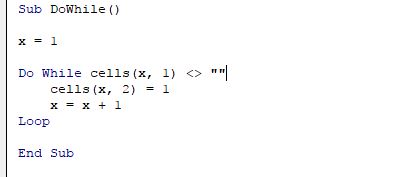
Loop While
The Do Loop While is similar to the loop until such that, the loop code will run at least once before checking the conditon.
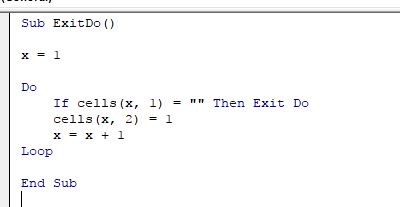
Exit Loops
To exit loops anywhere in between use the Exit Do keyword.
Events
Intro Events & Selection Change
Worksheet events occur whenever something happens on the worksheet. There are other methods to trigger a macro besides just tying it to a button.
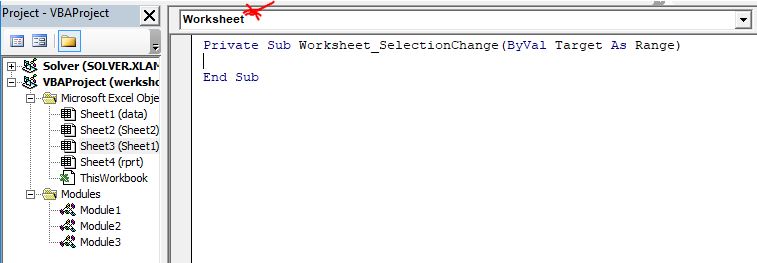
In the VBA editor change from General to Worksheet and you will see a sub for Worksheet_SelectionChange. Every time you click on a different cell of the worksheet this sub will run the code inside it.
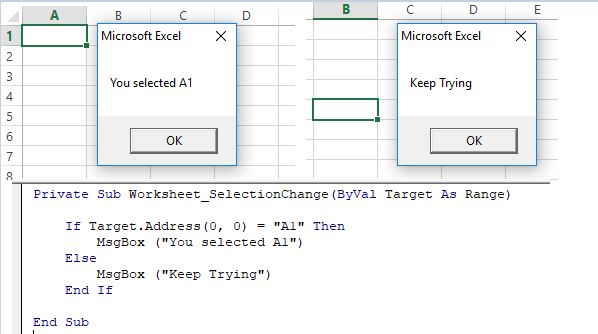
The sub passes in an argument called Target that will get the value of the cell that the cursor is moved to. You can use target.properties to access information about the targeted cell.
Activate Event
The activate event will trigger when you change worksheet tabs. You must select Worksheet and then Activate.

Deactivate Event
The deactivate event will trigger when you leave current worksheet tab for another one. You must select Worksheet and then Deactivate.

Before Delete
The BeforeDelete event will trigger before deleting a worksheet. It doesn’t prevent you from deleting just executes the code before you delete. You must select Worksheet and then BeforeDelete.

Before Double Click
The Before Double Click event will trigger before the double click action takes place. There is an additional argument called Cancel that is passed in and its of a boolean value. If cancel is false after the double click code runs the cursor will then place cursor ready to edit contents of the cell clicked; to stop this make cancel true.

Before Right Click
The Before Right Click event will execute code before the original right click function works. Setting cancel to true here will prevent the original right click menu from popping up after.

Calculates Event
The Calculates event will recompute all the formulas for the worksheet. The example given by Microsoft was to autofit the columns A through F.

Disable Events
You can disable events on a workbook by using the Application.EnableEvents object and setting it to false.

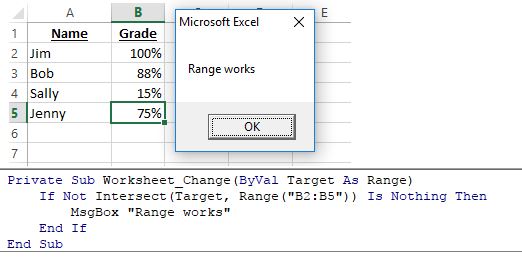
Change Event
Change event will run whenever any cell value changes.

You can also compare with a range instead of just a single cell. You will need to use the intersect function to compare your target and then the range to compare it to.
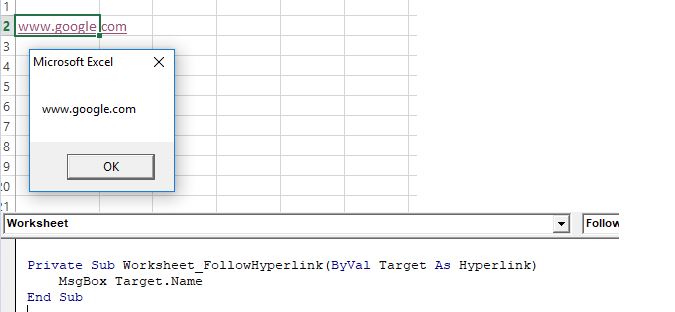
Hyperlinks
Follow hyperlinks will get a hyperlink in a cell and pass it as an argument. Using the target you can select from a list of properties to edit and manipulate the hyperlink.
Workbook Events
Workbook Open
Workbook events are like worksheet events but they effect the entire workbook. In the VBA editor select the ThisWorkbook icon to create macros for the entire workbook. The Open event runs as soon as the workbook is open.

Workbook Activate
Workbook Activate event runs once you click on the workbook. If you have 2 workbooks open and switch between them each time you lose focus and come back the Activate macro will run.
Before Save
Workbook Before Save will trigger when you click the save button and then execute the macro before saving. If cancel is set to true then it won’t save.

After Save
Workbook After Save will trigger after the workbook tries saving. It returns a Success argument that is true/false depending on if the workbook saved successfully.

Before close
The Before Close event runs before you close the workbook. It also passes in the Cancel argument as a boolean.

Before Print
The Before Print event runs before you print a worksheet. It also passes in the Cancel argument that if set to true won’t allow anyone to print. This is good in preventing confidential data for being allowed to print.
Workbook Deactivate
The Workbook Deactivate event is similar to the Workbook Activate event but triggers right after you lose focus of the workbook.
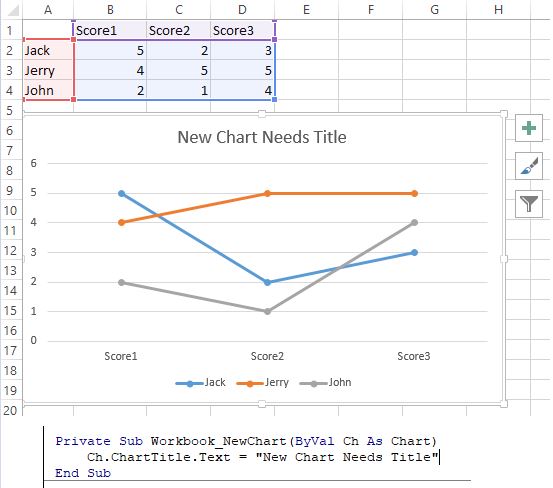
New Chart
The New Chart event is when you create a new chart. The Ch argument is a chart object. Whenever you create a new chart inside the workbook the values assigned will become the default values of the chart. If you need to figure out how to adjust some of the other chart properties its best to record a macro and then reverse engineer it.
New Sheet
The New Sheet event runs everytime you create a new worksheet. You can edit the properties of the new sheet by using the passed in object Sh. For example you can edit the font type on all cells to be says bold ex: Sh.Cells.Font.Bold = True.
Sheet Activate
The Sheet Activate event triggers each time you are in focus on the worksheet. The object passed in Sh is the current sheet.
Sheet Before Delete
The Sheet Before Delete runs when any worksheet on the workbook is deleted. There is no Cancel variable to prevent deletion.
Sheet Before Double Click
The Sheet Before Double Click runs when you double click anywhere on the entire workbook. The arguments passed are worksheet, target, and cancel options.
Sheet Before Right Click
The Sheet Before Double Click runs when you right click anywhere on the entire workbook. The arguments passed are the worksheet, target, and cancel options.
Sheet Calculation
The Sheet Calculation runs when you edit any formulas anywhere in the entire workbook.
Sheet Change
The Sheet Calculation runs when you change any value of a cell in the entire workbook
Sheet Deactivate
The Sheet Deactivate code runs when you leave the current worksheet to another one.

Sheet Selection Change
The Sheet Selection Change runs anytime you move your cursor to a new cell position anywhere in the entire workbook.
Window Activate
The Window Activate only triggers when the workbook itself is activated and in focus.
Window Deactivate
The Window Activate only triggers when the workbook itself is deactivated and loses focus.
Window Resize
The Window Resize runs each time you resize the workbook. It passes in a window object Wn that you can get height, width, size and other information about the window.
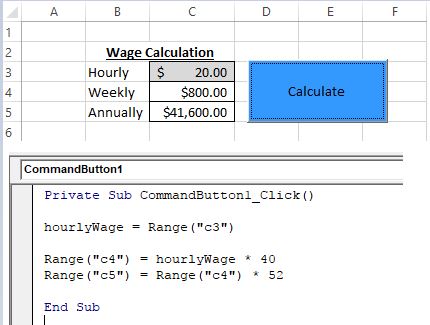
Active X forms allow a lot more customization and give you a ton more information than a simple form control. You are able to change everything from the name to the mouse cursor. To get the information right click and select properties. Also active x allows you to select from various different types of events.
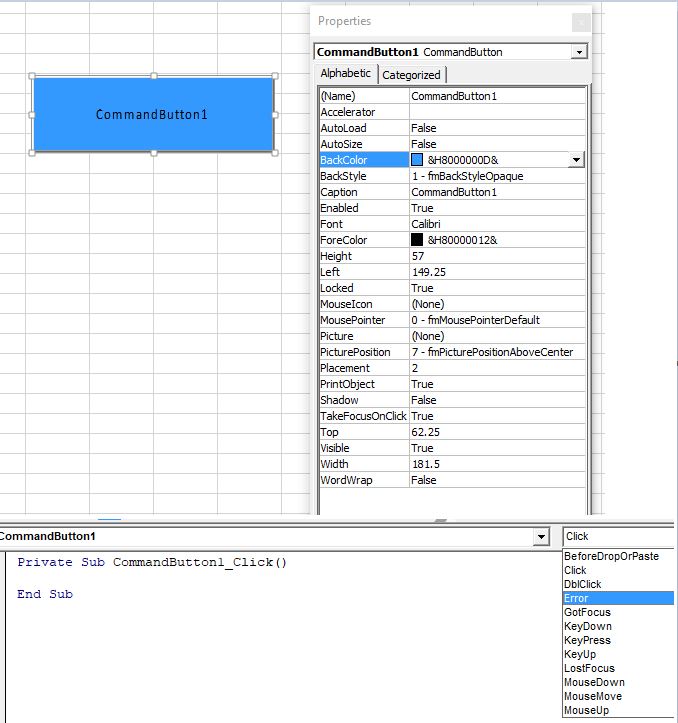
Below is an example of the code you can use to create a simple wage calculator. With a click, double click, or other events of a button you can compute multiple cells. This is also useful so that formulas cannot be accidentally erased when hardcoded into the excel cell.
Key Down/Press Event
The keydown and press events occur whenever a key has been pressed and will return an integer value corresponding to the key. Click Here For Complete List of KeyCodes. The variables that are passed in is the KeyCode as an integer and Shift which checks to see if shift was held during the event.
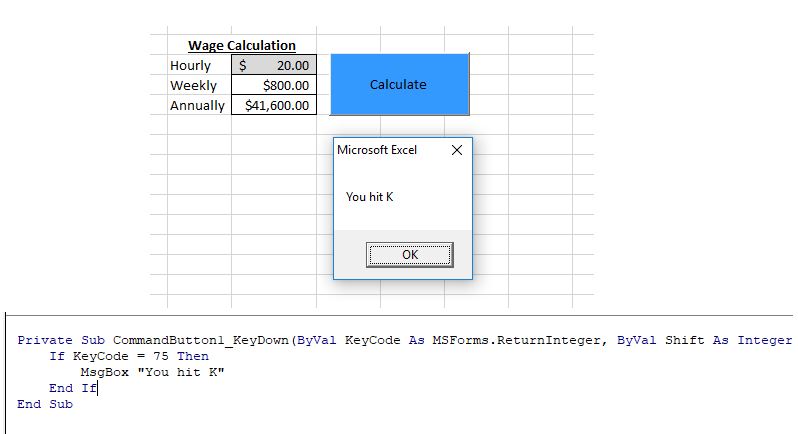
The key press event is similar to keydown but it returns a value based on the ASCII code value. Click Here For The List of ASCII Codes.
Mouse Move & Application Statusbar
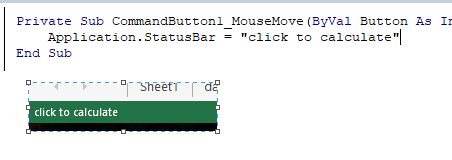
The mouse move event triggers when your mouse moves onto the object. The additional arguments passed give you the x and y coordinates.

You can add a status bar message by using the Application.Statusbar keyword. This will provide additional information to the user. You can set the value to false to get ride of the statusbar message.
Mouse Up/Down & Left Middle Right Click
You can get specific on when to execute the code depending on after mouse has been clicked or as soon as it is on the down phase. Left, Right and Middle clicks are pretty self explanatory.

GotFocus and LostFocus
The GotFocus event occurs when you click on the button. The LostFocus event triggers when you click away or tab away from the button.
Checkbox
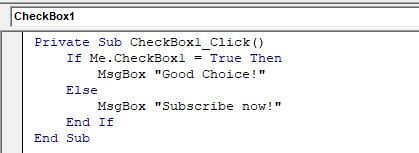
The checkbox object only allows for a true or false value. Using the keyword Me is equal to this and reference’s the current worksheet. You can combine other forms and use the checkbox’s value.
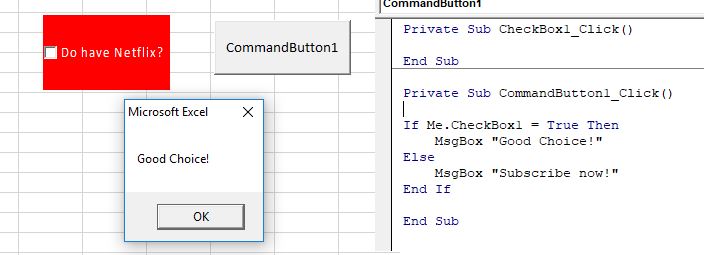
You don’t need to be dependent on a button to utilize the checkbox. You can trigger codes based on the interaction with the checkbox.
Linked Cell
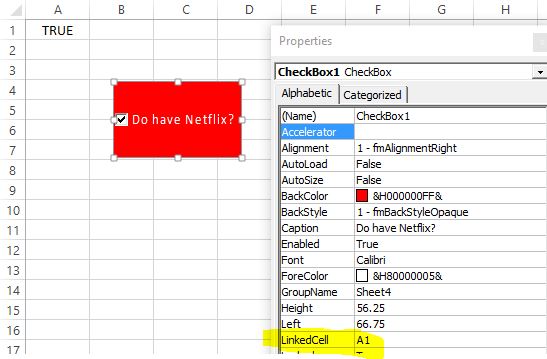
You can link a specific cell to a form. For example the checkbox’s value can be linked to cell “a1” and whenever you check/uncheck the box the value in “a1” will change. To link a cell right click the form and in properties under LinkedCell enter the cell value.
Option Button
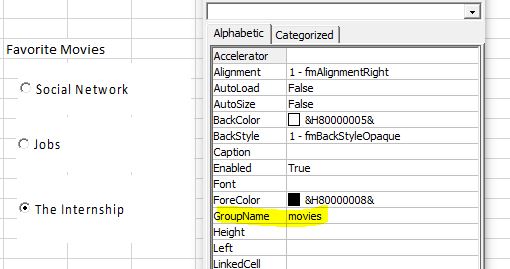
The option button is more of a grouping setting; such that, you should use more than one. When the option button’s are grouped together you may only select one. To group option buttons you need to first cntrl + click to select the options you want in the group then click on properties in the developer tab. Fill out the property called GroupName to create the group.
To neatly format the icons you can select the option buttons and go to Format and under Align select the appropirate function in most cases its Algin Left. To manually align for the small mm offsets you can use the arrow keys. Another tip on selecting the entire group as one unit.
Below is a sample program on how you can use conditions with the optionbox forms.
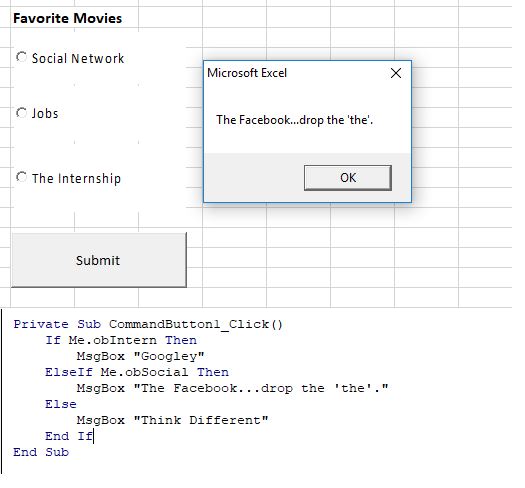
You can create a checker to see that the user in fact selected the required conditions in order to run. Have an If statement checking to see that at least one of the choices is selected; use the Or keyword in the conditional IF x or y or z. Another way is you can set the confirmation button to invisible and when the conditions are met change it to visible.
Spin Button & Textbox
The spin button are arrow buttons that are either up and down or left and right and cycle through a list of choices. The two most common events are spin up and spin down.
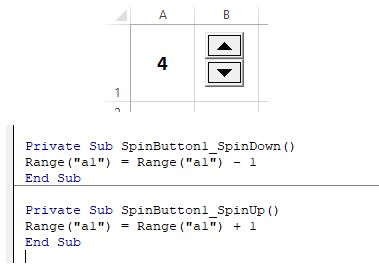
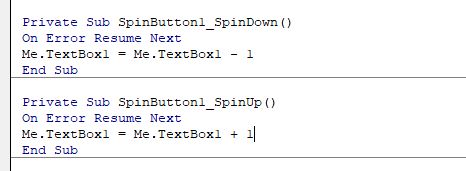
When cells are empty the compiler automatically thinks its 0 this is why a textbox is great form to be combined with the spinner. Textbox always contains a text value so adding a number to it will not work and throws an error. You can use the On Error Resume Next and/or check to see if text is empty. Another method is to check to see if it is a numerical value using IsNumeric.
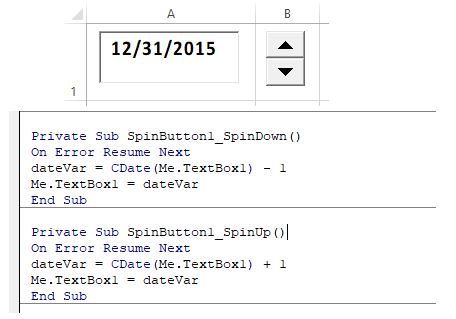
Spin buttons can also be used for more than just numbers. You can convert the number into a date and use that to display the date type. You can use the CDate() function to convert into a date.
Labels
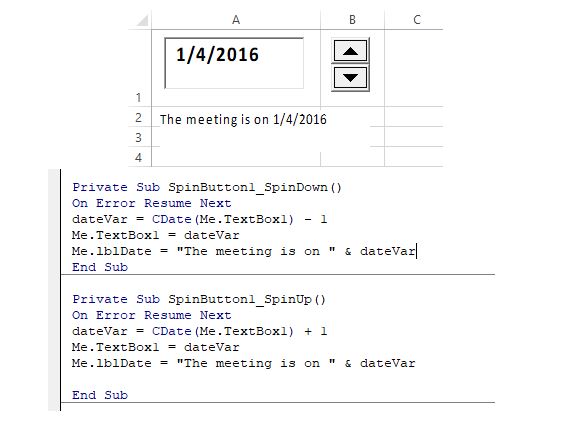
You can create labels to make your sections more descriptive. You can also add a picture and change the look and feel of the label in the Properties.
ComboBox Fill with List Fill Range
The list fill box is good to create a dropdown list of categories for the user to select from. You setup a group and in properties set the group name into ListFillRange. The combo box can have a list and or textbox.

Sometimes you will need to have a dynamic range so that when new records are added it automatically picks up. To do this click alt + I + N + D for the names manager edit the value to offset(starting cell, move down #, left or right #, how many rows wide? use counta(get count of nonblank cells) - header(1), how many column wide (1))

With combo boxes you can have multiple columns. In the ComboBox properties change the column count and expand your named range to include more than one columns.
There are more customizable ways to add items to your combobox. Using the .AddItem function. To clear up all entries inside the combobox use the .clear function.
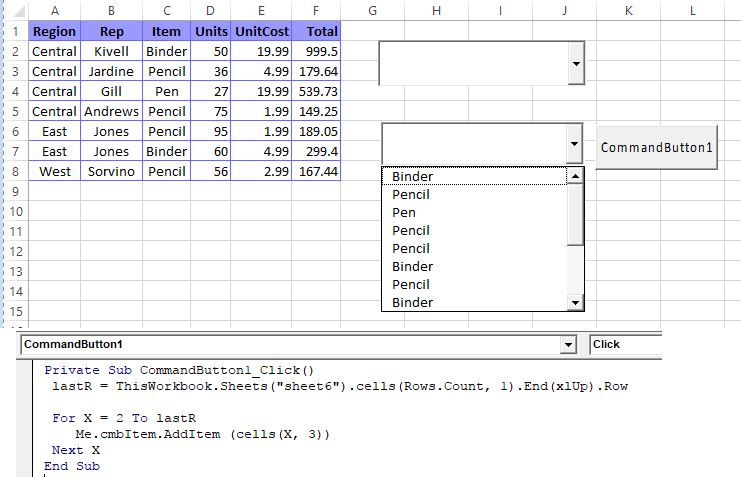
If you have multiple columns and need to add items you will have to use some array manipulation. Arrays start with 0.

List Box
List box is a box with a list in it. You can specify the group name in the properties as well as the number of columns. You can adjust the column widths also just put ; in between each column. If its a named range you can turn on the property of ColumnHeads to true.
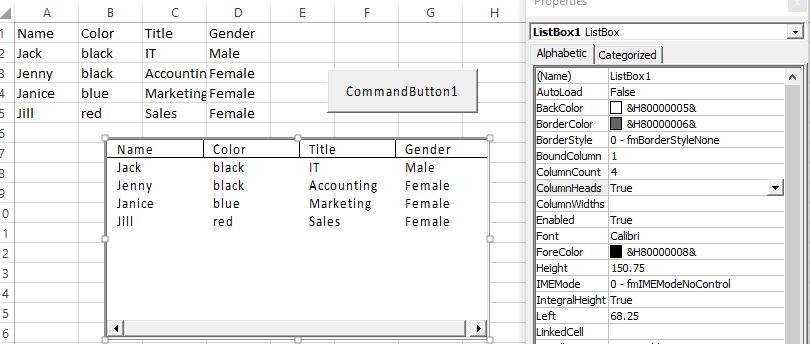
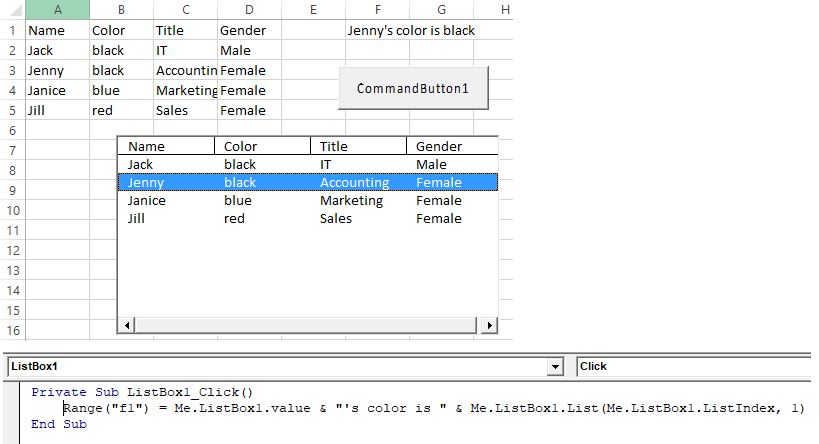
The list box takes the value of whatever line the user clicks on. Columns are in array format starting with 0. You can have a linked cell or you can put events on it using click events.
To use the other columns data you will have to use the list and find the index.
To make the listbox dynamic you can use the AddItem function. You can also hide columns but keep value by changing the property of the column’s width and setting it to 0pt
Scrollbar
The scrollbar can be used to scroll through either data or values. Using the properties menu you can change the min and max properties. You can also change the small changes (when arrow is pressed) or large change when the middle of the scroll bar is pressed.
Image Control
You can create an image and use that as a button as a control. One use is to link it to a webpage using FollowHyperlink ("http://www.google.com")
Toggle Button
The toggle button has only 2 values a true or false and you can click it to make it true and click again to make it false.
User Forms
Hide Show & Unload
To get to the userforms menu click on the icon and a new editor will open up as well as creating a new forms folder. To get form toolbox you can go to View then Toolbox to bring it up.
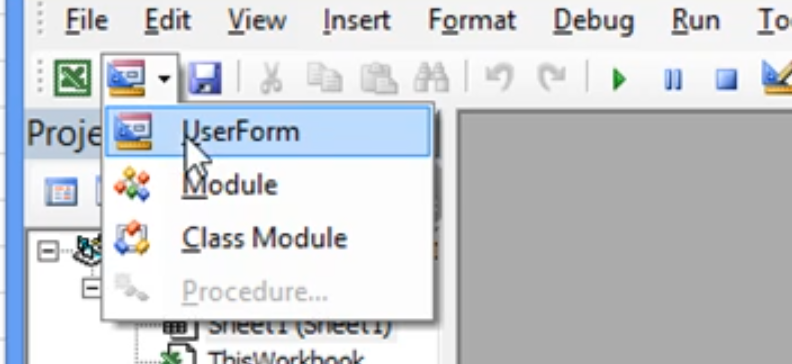
You can hide and show a user form by using the Hide and Show commands.
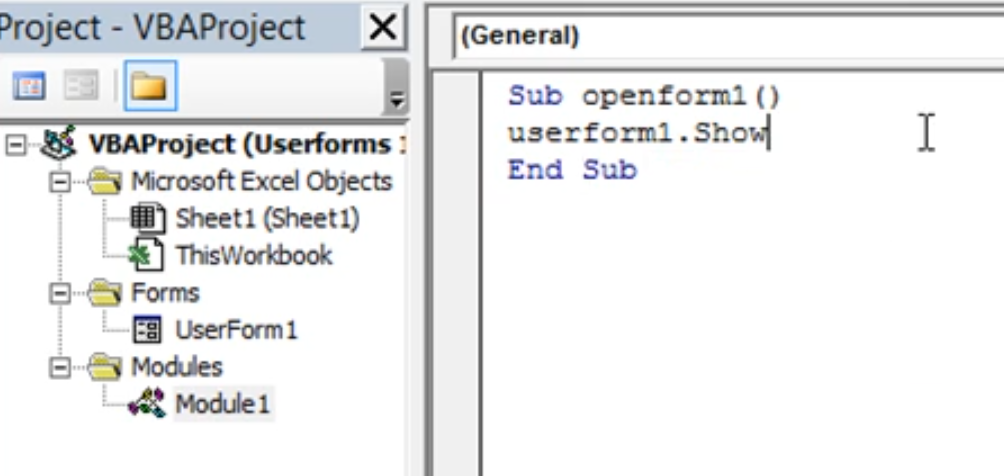
Status Box
User form boxes also have properties you can use F4 shortcut. To populate data into the form use the Initialize event to load data on startup. You can either use the AddItem function or alternatively go to properties window and selected a range or named source into the RowSource box.

New Data
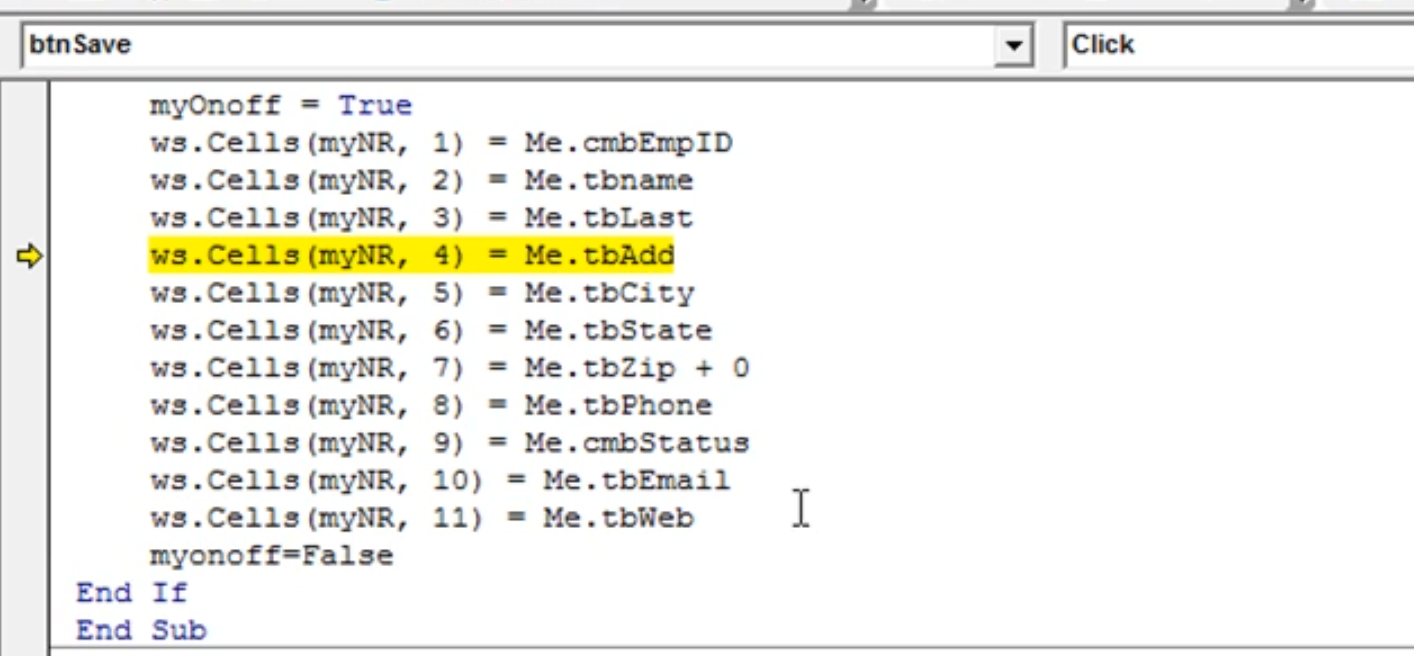
From the user entry from you can create a button to update the data records. To do this you find the last row of the data set then extract each data from the form and add it to the excel sheet. If you have numbers you will need to change the format to number.
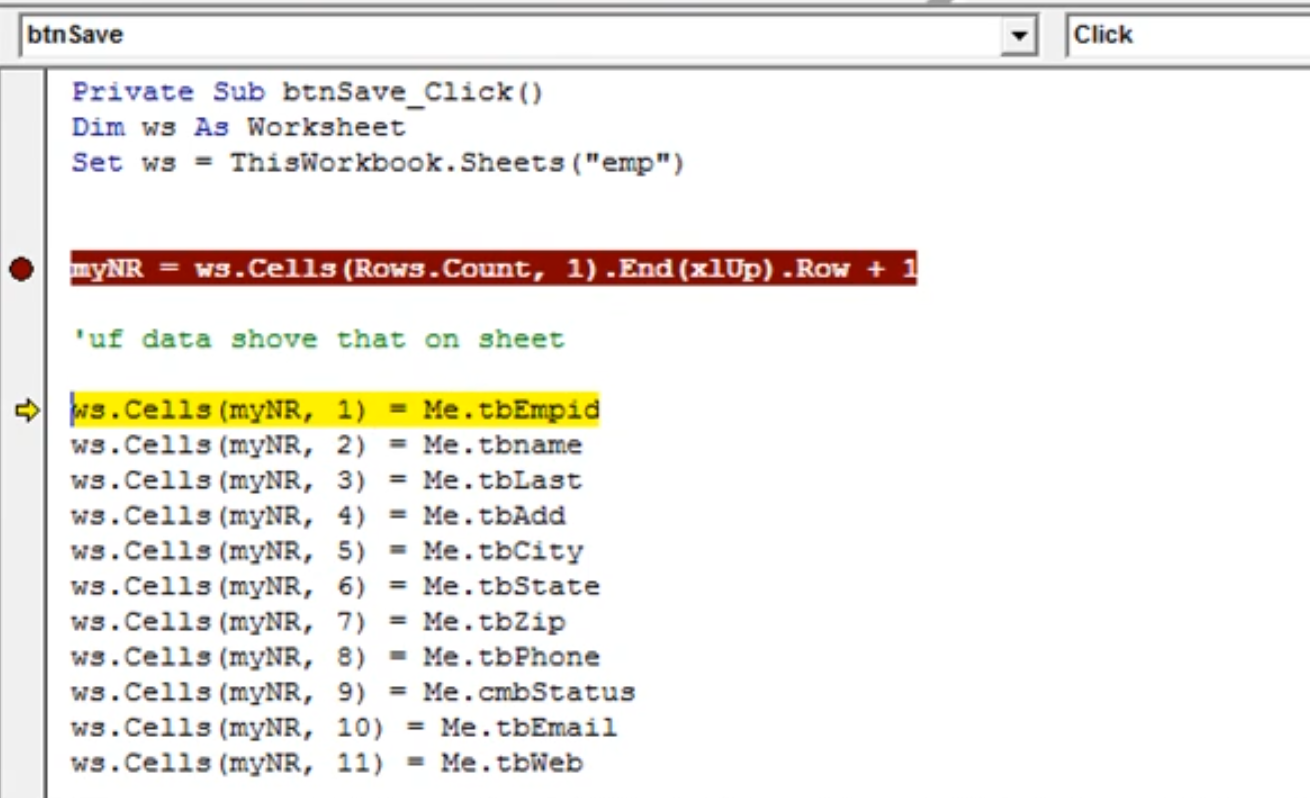

Convert Text to Numbers
When you extract data from the user form it will be in text format and will need to be converted if you need it to be any other type such as numbers. The best way to do this is to +, -, /* or // to change the text into a number.
Tab Order
To set the tab index order so that when a user is typing and hits tab it goes to the next box you need to change the properties of each text box in sequential order. Change the TabIndex field and start with 0, 1, 2 and so on.
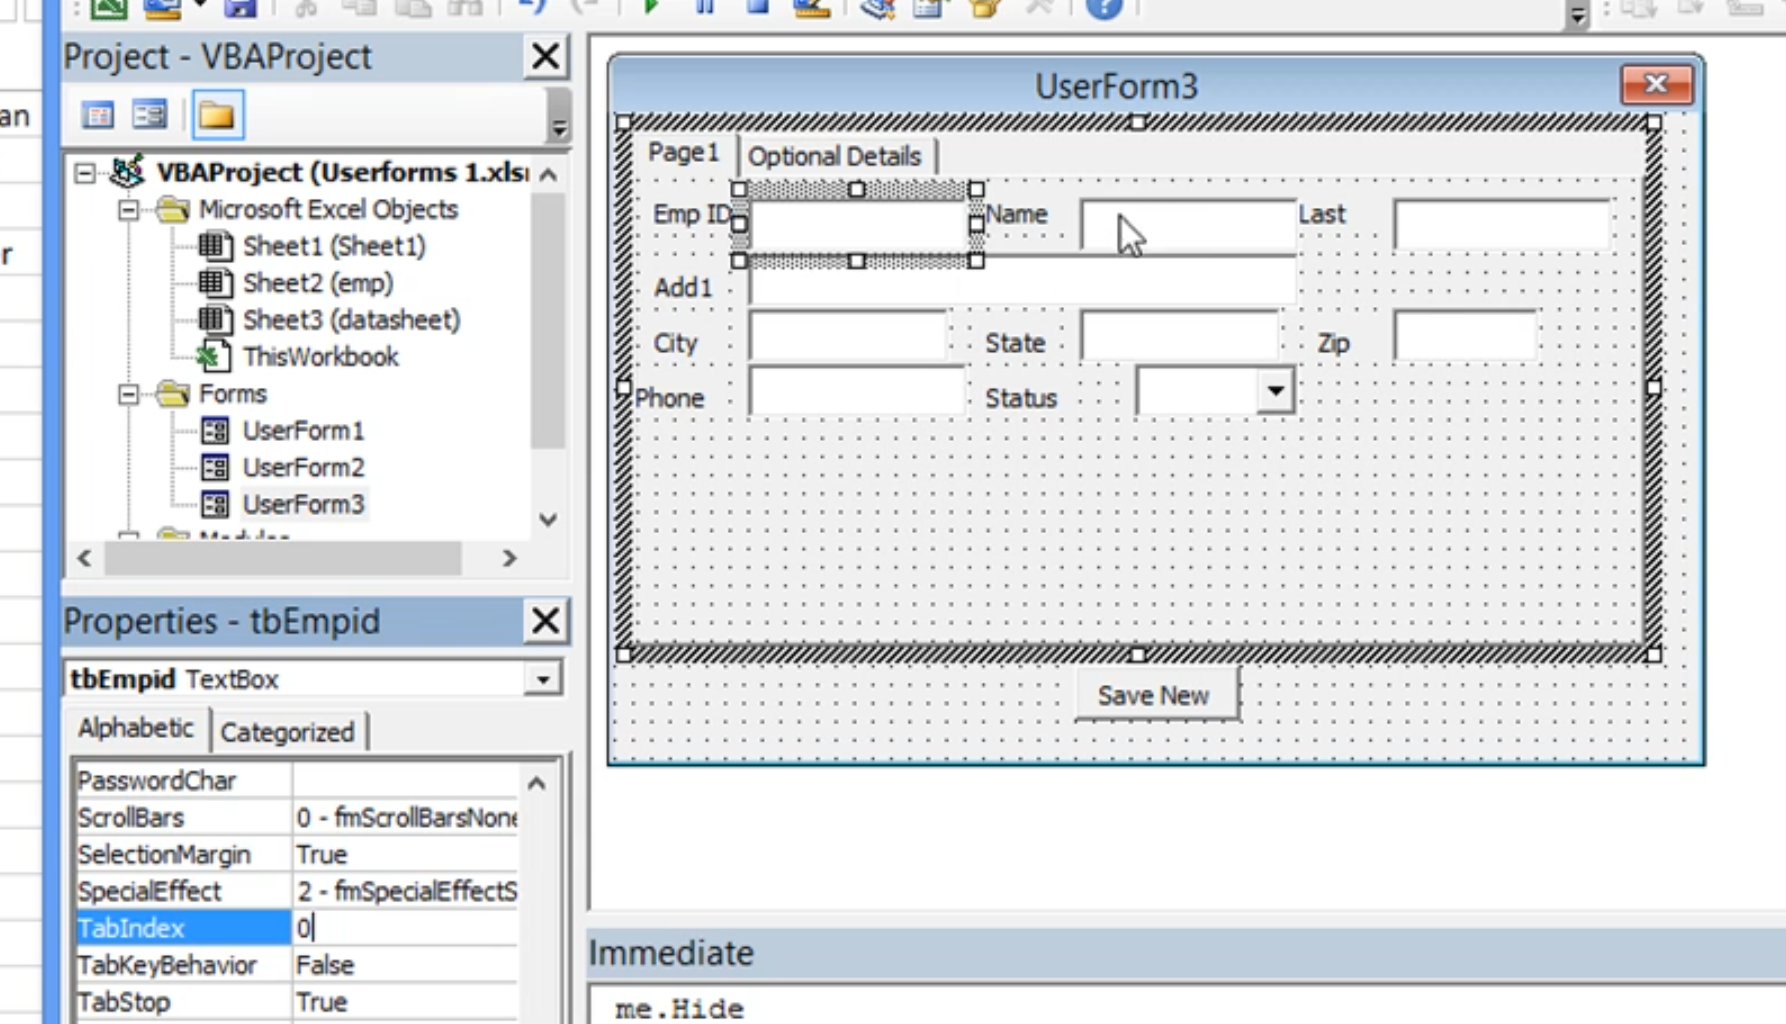
Default Value
To set a default value in a textbox set it in the caption property.
Prevent Duplicates
Prevent duplicate records by creating a loop and checking to see if ID created matches.

Edit Mode
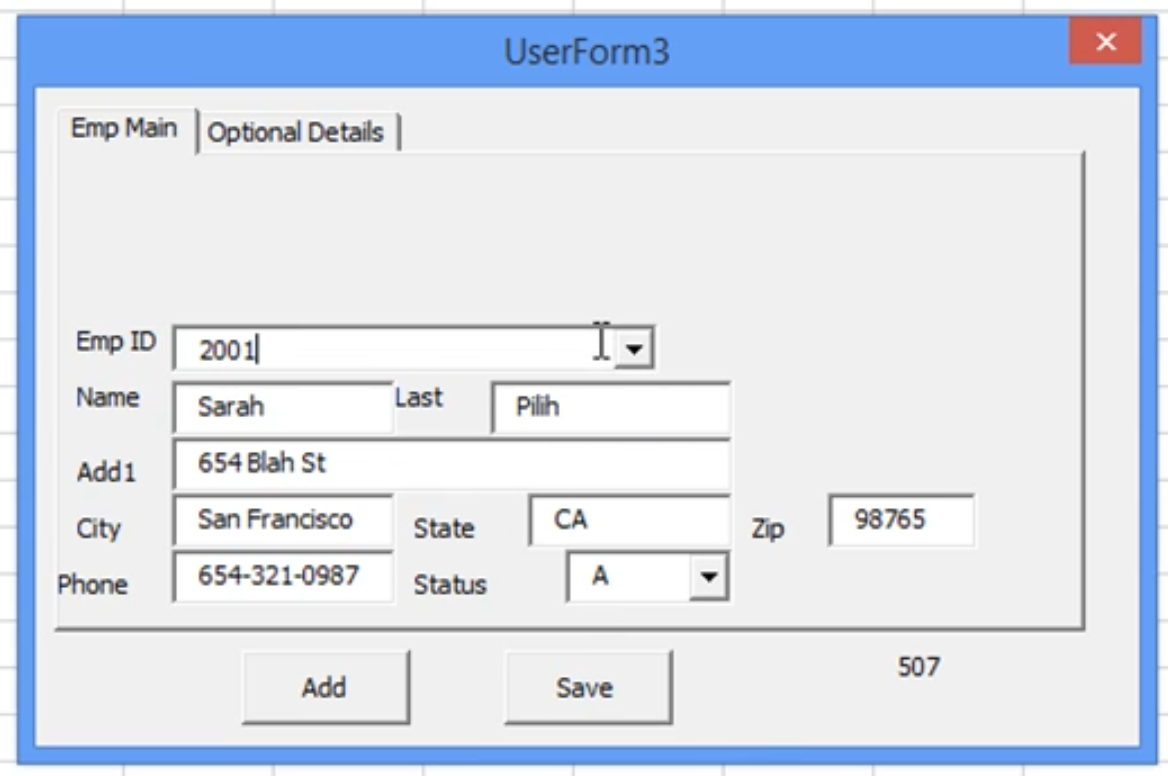
Your form should also be able to edit a record. To do this you should create an edit button and combine it with a dropdown list of all the records (RowSource). You should create a dynamic named range.
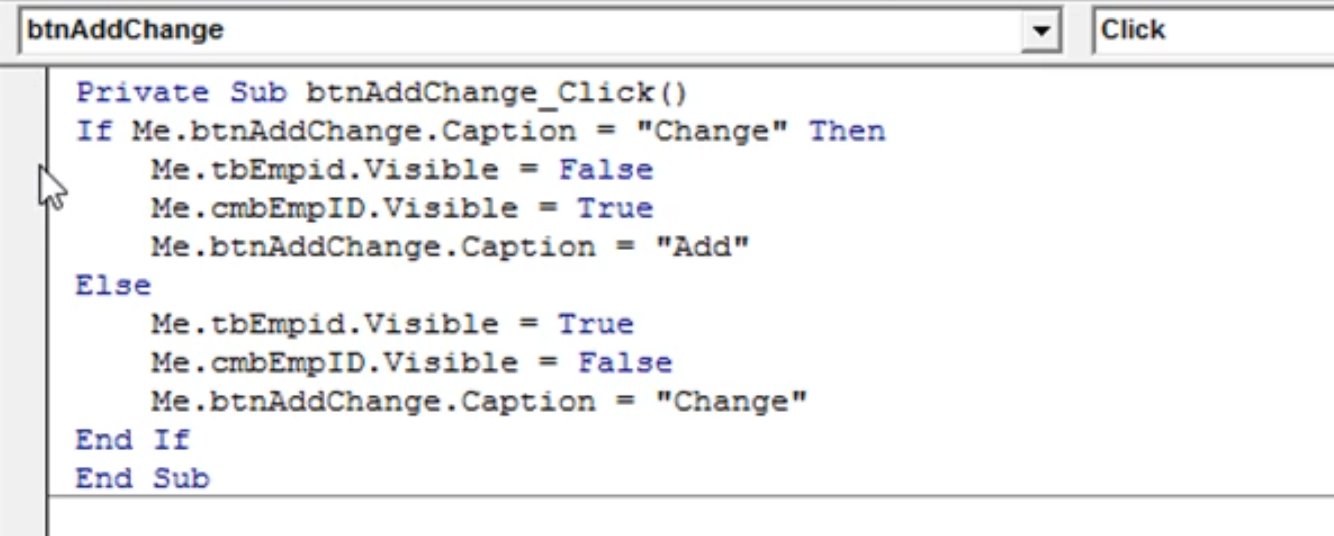
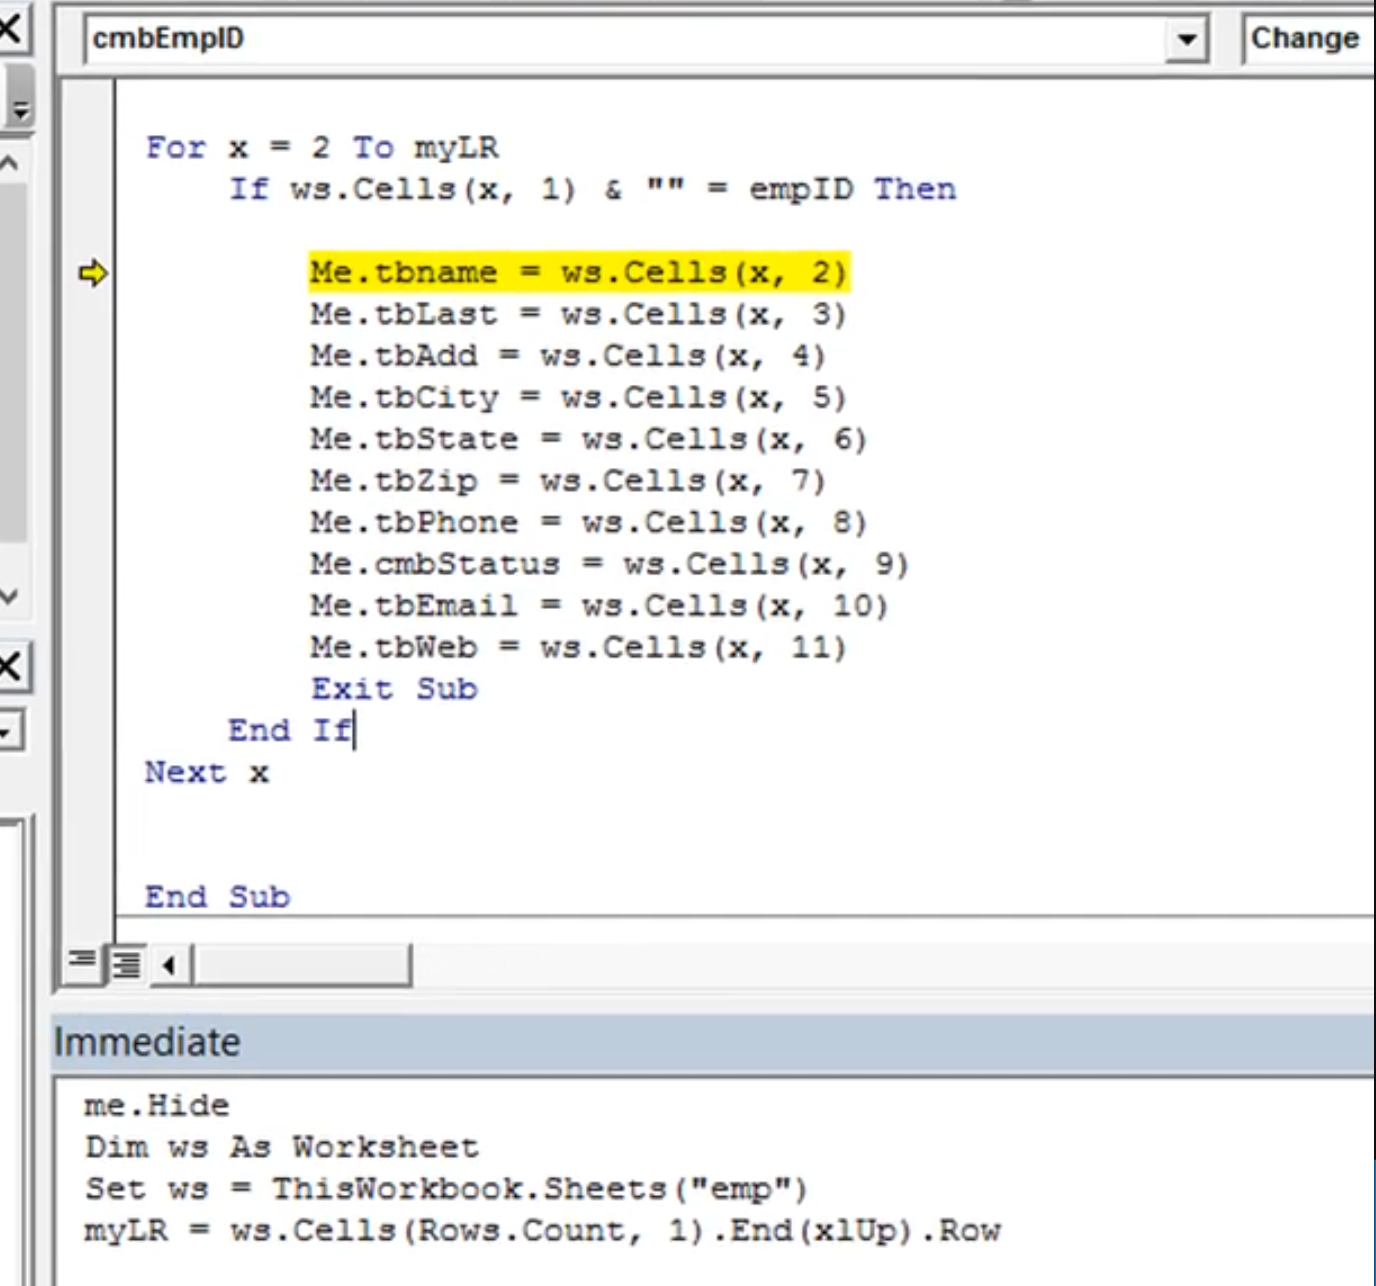
Once the record has been added its best to clear out and blank the text boxes by just setting them to blank string. To edit create a loop and compare a unique ID to see if it matches. You may need to convert number to text and the easiest way to do that is just add & "" to convert it to a text. When saving it would update the record.
Reports w Filters
You can create another userform that can extract the data and create a useful report.
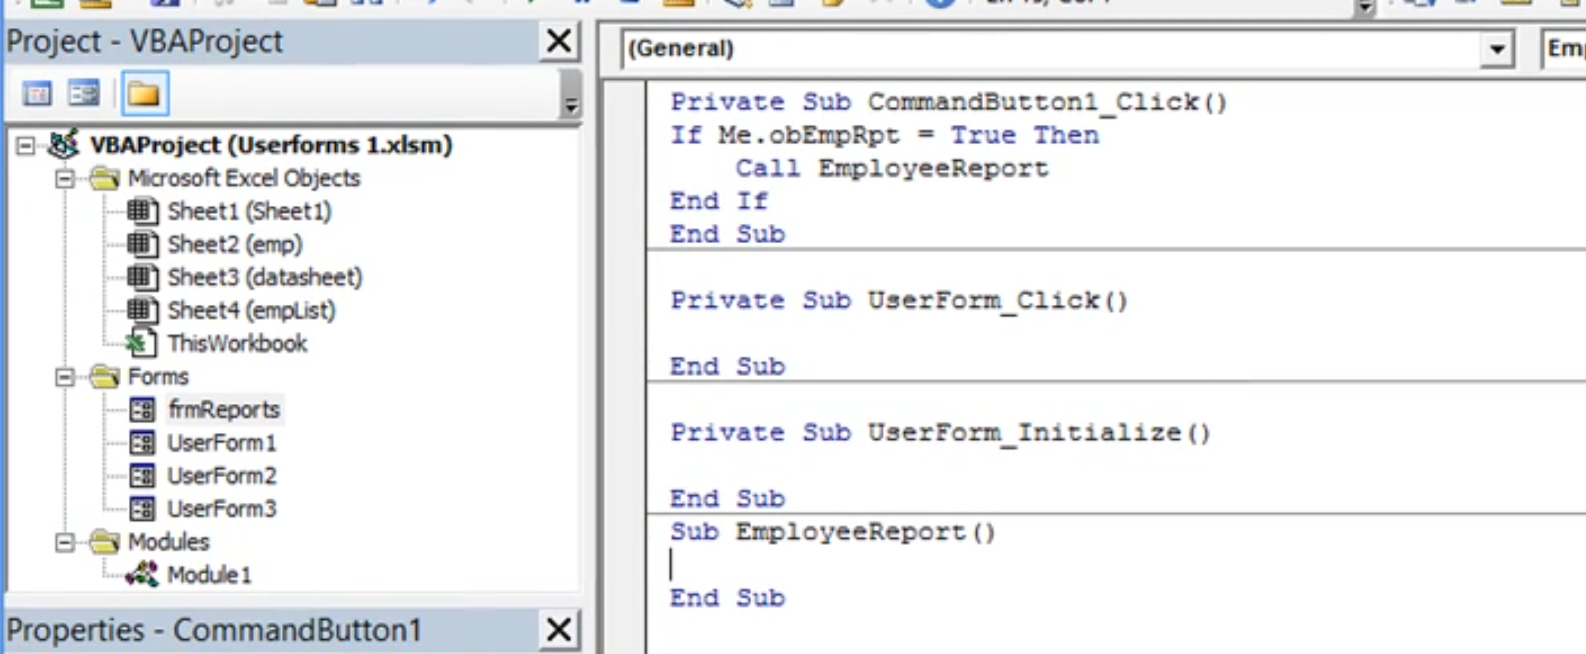
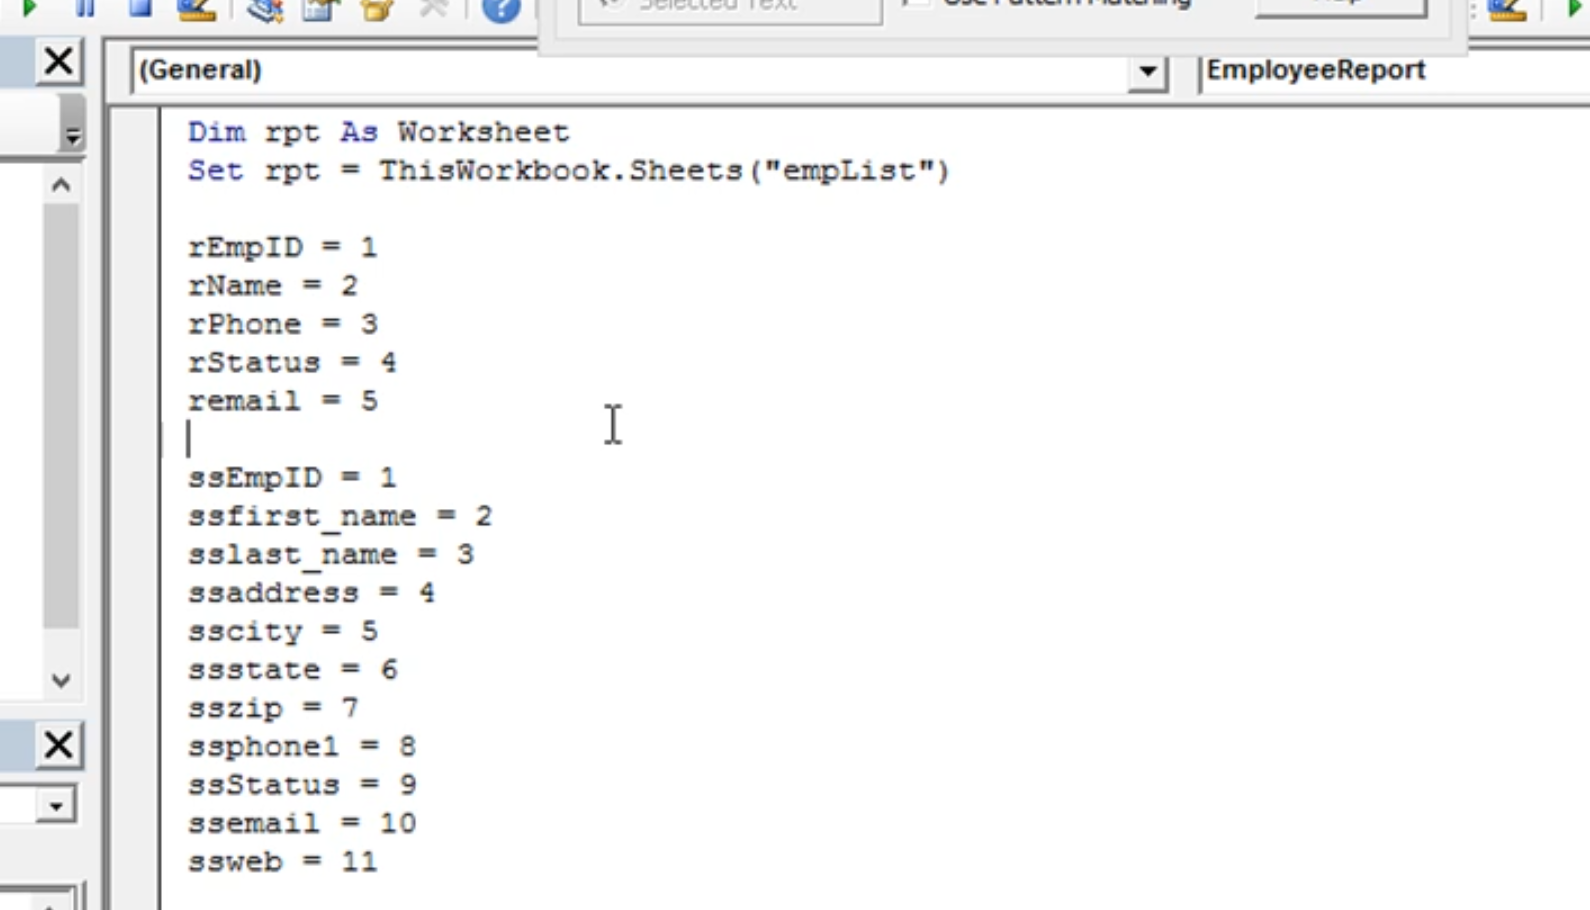


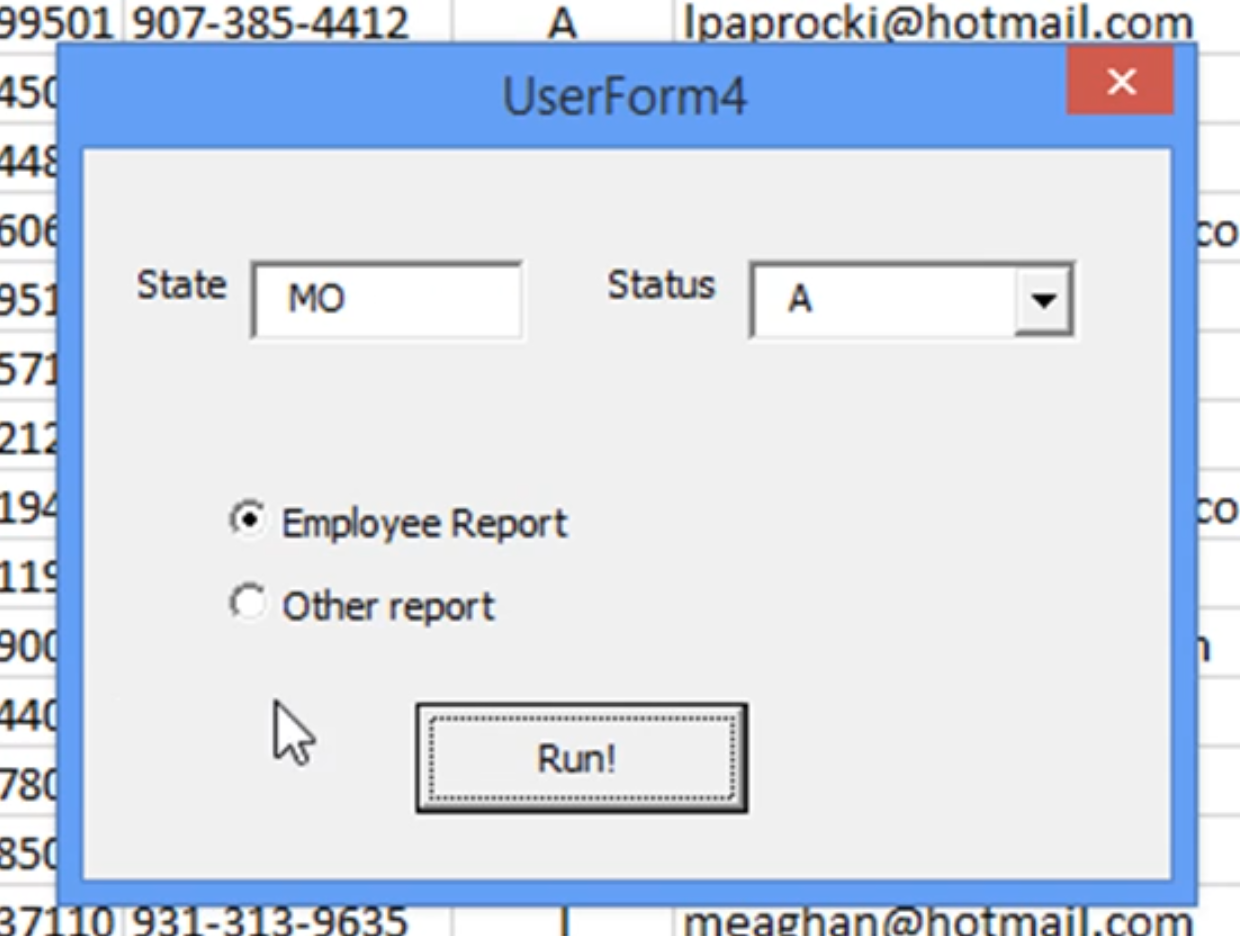
Remember to clear our last report before running another one.
